The schema registry
A central hub for your data graph.
Apollo Graph Manager provides a schema registry that serves as a central hub for managing your data graph. The schema registry enables you to explore your schema's types and fields, track its change history, and improve your production server's security by removing the need for introspection. You can also register variants of your schema to support environments besides production, such as test or staging.
Prerequisites
To get started with the schema registry, first complete the following setup for the project that includes your GraphQL server:
- Install the Apollo CLI
Ensure that node and npm are both installed, then run:
npm install --global apollo
This installs the CLI globally, but you can also install the CLI in your project's devDependencies and use it via npm-scripts or npx.
If you haven't yet, log in to Graph Manager and create a graph for your organization by clicking New Graph in the upper right.
Then go to your Personal Settings page and obtain or create a new personal API key.
When you have your API key, add it to a .env file in the root directory of your project, like so:
ENGINE_API_KEY=user:gh.StephenBarlow:uB0sLhga7EemND1wTa6BcZ
Do not add the .env file to version control. It contains secrets that differ both per user and per environment.
When you execute Apollo CLI commands (such as to register a schema), the CLI obtains your API key from the .env file and uses it to authenticate with Graph Manager.
Also in your project's root directory, create a file named apollo.config.js. The Apollo CLI uses configuration options in this file during the execution of various commands.
A basic apollo.config.js file looks like this:
// apollo.config.js
module.exports = {
  service: {
    // Must match the name of your graph in Graph Manager
    name: 'docs-example-graph',

    // EITHER THIS
    endpoint: {
      url: "https://localhost:4000"
    }
    // OR THIS
    localSchemaFile: './path/to/schema.graphql'
  }
};
To register your schema with Graph Manager, the Apollo CLI needs to know how to access the schema. You can do this by providing either a service.endpoint object or a service.localSchemaFile string in apollo.config.js.
If you provide an endpoint object, the CLI executes an introspection query on the GraphQL endpoint at the provided url to obtain your schema. To use this method, introspection must be enabled on your server.
If you provide a localSchemaFile string, the CLI obtains your schema via the specified file path.
Registering a schema manually
Register your schema with Apollo Graph Manager by running the apollo service:push command from your application's root directory, like so:
$ apollo service:push
The CLI fetches your schema via a configuration option you set up in Prerequisites Section and pushes it to Graph Manager.
Every time you push a new version of your schema, it's appended to your graph's schema history.
Registering a schema via continuous delivery
To get the most out of Graph Manager, you should register each update to your production schema as soon as it occurs. To achieve this, include a call to apollo service:push in your continuous delivery pipeline.
Here is a sample continuous delivery configuration for pushing a schema to Apollo using CircleCI:
version: 2
jobs:
  build:
    docker:
      - image: circleci/node:8
    steps:
      - checkout

      - run: npm install
      # CircleCI needs global installs to be sudo
      - run: sudo npm install --global apollo
      # Start the GraphQL server.  If a different command is used to
      # start the server, use it in place of `npm start` here.
      - run:
          name: Starting server
          command: npm start
          background: true
      # make sure the server has enough time to start up before running
      # commands against it
      - run: sleep 5
      # When running on the 'master' branch, push the latest version
      # of the schema to Apollo Graph Manager.
      - run: |
          if [ "${CIRCLE_BRANCH}" == "master" ]; then  apollo service:push --tag=master fi
Viewing schema change history
The History view in Graph Manager lets you view the timeline of changes made to your schema:
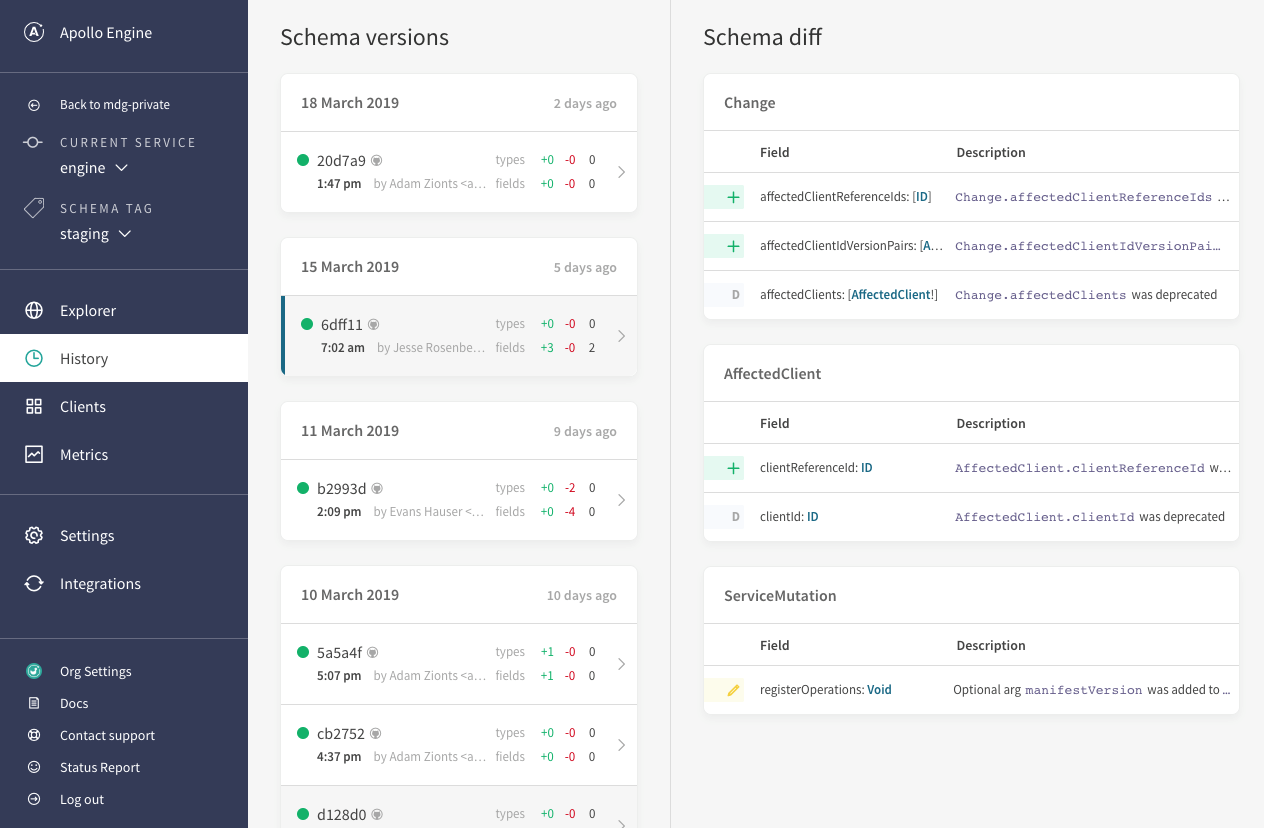
Only schema changes that you push to Graph Manager are included in this timeline, which is one of the most important reasons to include schema registration in your continuous delivery pipeline.
Managing environments with variants
Commonly, your application's staging and test environments use schemas that differ slightly from your production schema (especially if you're testing out updates to your schema).
Because these schemas represent different environments of the same application, it makes sense to associate them with each other. To achieve this, you can define variants of your graph.
Each variant of a graph functions as a standalone graph. It has its own change history, metrics, and operation registry.
Registering a schema to a variant
To register a schema to a variant, include the --tag=<VARIANT> flag in your apollo service:push command, like so:
apollo service:push --tag=beta
If you omit the --tag flag, the apollo service:push command always pushes to the default graph variant, named current.
Associating metrics with a variant
You can configure Apollo Server to associate the metrics it sends to Graph Manager with a particular variant. To do so, set the ENGINE_SCHEMA_TAG environment variable to the appropriate variant before initializing Apollo Server.
Alternatively, you can include the schemaTag option in your call to the ApolloServer constructor, like so:
const server = new ApolloServer({
  ...
  engine: {
    apiKey: "<ENGINE_API_KEY>",
    schemaTag: "beta"}
});
Make sure you associate Apollo Server's metrics with the correct variant! Otherwise, metrics from your staging and test environments will be included in reports for your production graph.
Tools that use the schema registry
- Keeping your registered schema up to date ensures that you get the best possible experience from Apollo tools that connect to the registry:
- The Apollo VS Code extension provides built-in linting on queries by validating against your registered schema. It also annotates fields with their descriptions and with performance indicators collected in Apollo's trace warehouse.
- The schema validation workflow protects your team from accidentally making breaking schema changes. It creates a diff between your local schema and the last schema pushed to the registry, and validates this diff against live traffic seen on your endpoint to warn you about problematic changes.
- Your schema's full history and current usage can be seen in Apollo Graph Manager. The History page tracks changes made over time, and the Explorer page shows which clients and which queries are using each field in your schema.
Previous:
Accounts and organizations
Next:
Schema validation
- New Content published on w3resource:
- HTML-CSS Practical: Exercises, Practice, Solution
- Java Regular Expression: Exercises, Practice, Solution
- Scala Programming Exercises, Practice, Solution
- Python Itertools exercises
- Python Numpy exercises
- Python GeoPy Package exercises
- Python Pandas exercises
- Python nltk exercises
- Python BeautifulSoup exercises
- Form Template
- Composer - PHP Package Manager
- PHPUnit - PHP Testing
- Laravel - PHP Framework
- Angular - JavaScript Framework
- Vue - JavaScript Framework
- Jest - JavaScript Testing Framework