Get started with Graph Manager
Hello! In this series we will give details to get you up and running with Apollo Graph Manager. None of this setup used in this tutorial series requires a paid plan.
You can use Graph Manager with any GraphQL server. Certain features (e.g., trace reporting) are currently best supported by Apollo Server.
To get started, you need to sign up by creating an Apollo GraphQL account following the steps below:
Step 1: Create your account
- Go to engine.apollographql.com and click Create an account.
- Complete the signup flow, which includes:
- Creating an organization that you can invite your teammates to
- Selecting a plan for your organization (the Free plan is always free, and the Team plan provides a free trial of advanced features)
You can sign up with either your GitHub identity or a username and password.
Step 2: Create your first graph
In Graph Manager, each graph corresponds to the entirety of a GraphQL schema. Your first graph will correspond to your GraphQL server's schema.
- Visit engine.apollographql.com again. Now that you're logged in, this opens the Graph Manager UI.
- Select the organization that you want to add your graph to. Then, click New Graph in the upper right.
- Specify a name for your graph and click Next. Graph Manager displays a list of instructions, which are also described in the next section.
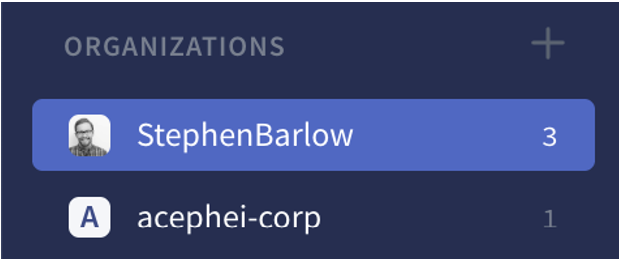
The list of organizations you belong to appears in the left column:
Step 3: Configure your project
- Install the Apollo CLI if you haven't yet.
- Add a .env file to your project's root directory if there isn't one yet. Do not add this file to version control. It contains secrets that differ both per user and per environment.
- Add the .env file to your project's .gitignore file.
- Obtain a personal API key from Graph Manager and set it as the value of ENGINE_API_KEY in your .env file:
How to obtain a personal API key
Personal API keys are secret credentials. Never share them with others or commit them to version control. Delete and replace API keys that you believe are compromised.
- Go to engine.apollographql.com/user-settings.
- In the Personal API Key section, click Create New Key. Your new API key appears in the Token column of the table.
- Optionally click the ... button to the right of the API key to give it a name, such as Local development laptop. This helps you keep track of each API key's use.
 //.env
# Don't worry, the author invalidated this API key before sharing it
ENGINE_API_KEY=user:gh.StephenBarlow:Rc6D_7mLxY74okHRCL2HMg
- Add an apollo.config.js file to your project's root directory if there isn't one yet. Unlike .env, you do add this file to version control.
- Add your newly created graph's name to apollo.config.js in the service.name field, like so:
//apollo.config.js
module.exports = {
  service: {
    name: "acephei"
}
}
Step 4: Register your schema
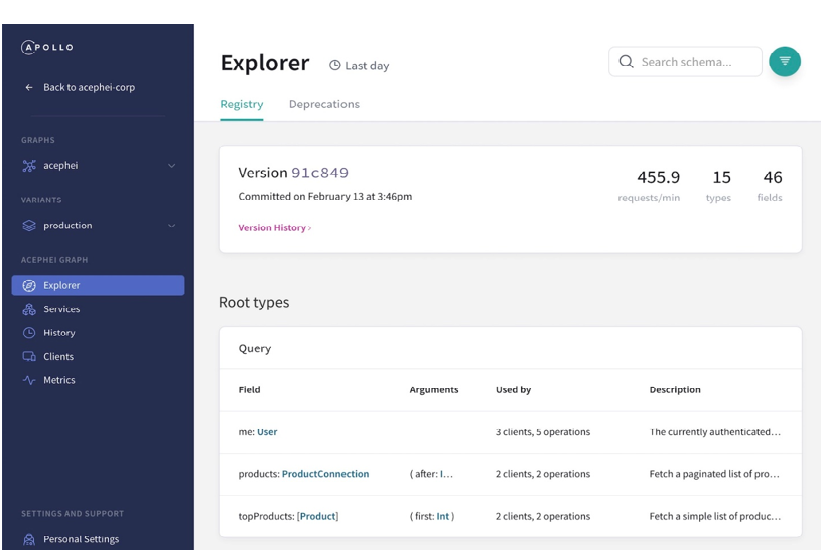
The schema registry sits at the heart of Graph Manager. It allows you to inspect your graph's schema and track changes to it over time:
You register your schema with the apollo service:push command. You need to provide your schema to this command, in one of the following ways:
Provide your schema via introspection
The Apollo CLI can obtain your schema from your locally running GraphQL server via an introspection query. This is a special query supported by most GraphQL servers that returns the server's full schema.
To provide your schema via introspection, first run your GraphQL server locally. Then, execute the apollo service:push command from your project's root directory and provide your GraphQL server's localhost URL, like so:
apollo service:push --endpoint=https://localhost:4000/
Provide your schema via a local file
If your schema is defined in a .gql or .graphql file, you can provide that file to Graph Manager.
To do so, run the apollo service:push command from your project's root directory and provide a path to the schema file, like so:
apollo service:push --localSchemaFile=./schema.gql
The --localSchemaFile option also supports a comma-separated list of paths if your schema is defined across multiple files.
Step 5: Set up trace reporting
Graph Manager can ingest operation traces from your GraphQL server to provide performance metrics for your data graph.
To begin pushing these traces to Graph Manager, read Pushing trace data to Graph Manager.
Step 6: Set up continuous delivery
Your schema is now registered with Graph Manager, and your server is pushing operation traces!
However, to get the most out of Graph Manager, you need to re-register your server's schema every time it changes. The easiest way to do this is to make schema registration part of every deployment in your application's continuous delivery flow.
Step 7: Explore
The best way to familiarize yourself with Graph Manager's capabilities is to explore it! Visit engine.apollographql.com and check out the various views and what they provide.
Previous:
Hooks migration guide
Next:
Accounts and organizations
- New Content published on w3resource:
- HTML-CSS Practical: Exercises, Practice, Solution
- Java Regular Expression: Exercises, Practice, Solution
- Scala Programming Exercises, Practice, Solution
- Python Itertools exercises
- Python Numpy exercises
- Python GeoPy Package exercises
- Python Pandas exercises
- Python nltk exercises
- Python BeautifulSoup exercises
- Form Template
- Composer - PHP Package Manager
- PHPUnit - PHP Testing
- Laravel - PHP Framework
- Angular - JavaScript Framework
- Vue - JavaScript Framework
- Jest - JavaScript Testing Framework